Deluge Port Issue: A Clear Fix for Incoming Connections
A Deluge port issue means the client has not detected incoming peer connections. Check its actual listening port and the route reaching it; downloads may still work.
Start here · separate the signals
Deluge no incoming connections: what to check
A warning does not mean every torrent is broken. Match the symptom before changing settings.
Start with the computer running Deluge
How to fix a Deluge port issue
On a desktop, check the computer where Deluge is open. If you control it through a browser or thin client, check the NAS or server doing the downloads instead; that background program is the daemon.
Find your Deluge incoming port
Open Preferences → Network and record Active Port: the port Deluge is actually listening on. Also note whether Use Random Ports is enabled.
Write this down before changing a rule
Active port + computer running Deluge
Do not pick a new number yet. A home-router rule will need a fixed port; a VPN may assign the number for you. A VPN carries traffic through its provider’s server, so its incoming port must be opened there. The matching setup is below.
Allow Deluge through the local firewall
Check the firewall on the computer or NAS doing the downloads. Allow Deluge’s incoming TCP and UDP traffic. If your rule specifies a port number, match Active Port and update it whenever that number changes.
Deluge port issue on Windows 11 or Windows 10
Open Windows Security → Firewall & network protection → Allow an app. Allow the running Deluge application on the active network profile. If you use explicit port rules or a third-party firewall, check TCP and UDP there too.
Confirm a local listener on Windows or Linux
Replace 50000 with your active port. Run these on the computer doing the downloads. A listener is the running program waiting for connections on that port.
Windows PowerShell
Get-NetTCPConnection -LocalPort 50000 -State Listen
Get-NetUDPEndpoint -LocalPort 50000
Linux / Raspberry Pi
ss -lntup 'sport = :50000'Check the local address and owning process. A listener bound only to 127.0.0.1 accepts connections from the same machine, not internet peers. Inspect Deluge logs for bind failures; keep the firewall enabled.
Test before choosing a repair
Deluge Test Active Port fails? Verify the right endpoint
Keep Deluge running. In Preferences → Network, note Active Port, then click Test Active Port. If you arrived here first, confirm that Deluge is listening and allowed through the firewall.
If the built-in test fails, which IP should I test?
Use an independent TCP port checker that lets you enter an IP address and port. Enter Deluge’s Active Port and the internet-facing address used by the computer doing the downloads.
Without a VPN: use that connection’s public IPv4; see how to find your public IP. With a VPN: use the VPN server’s public address for Deluge’s connection. If the browser is on another computer or excluded from the VPN, its detected address can be different.
- No local listener
- Return to the local checks above. Router rules cannot reach a program that is not listening.
- Listener exists, external TCP test fails
- Choose your setup below and check its forwarding rule.
- External TCP passes, Deluge test errors
- Read the daemon log. Its built-in test calls an external service; a service error is not proof of a closed port.
If the TCP test passes, try a well-seeded torrent you are authorized to share and check incoming peer activity. A TCP result does not prove UDP reachability. NAT Checker’s browser NAT test does not probe Deluge’s listener.
Port reachable but transfers still stuck? Check the torrent and queue before changing more network settings.
Port still closed? Choose your setup. Follow the matching section, then return to the test. A Docker installation can also use a VPN; its section explains both cases.
Home connection · no VPN carrying Deluge traffic
Deluge port forwarding on your router
Use this path when Deluge connects directly through your home internet. First give it a fixed incoming port: in Preferences → Network, turn off Use Random Ports, enter the same start and end number, and Apply. Confirm Active Port matches before creating the router rule.
Reserve the computer’s local (LAN) IP in the router’s DHCP settings so it does not change. Forward the active torrent port for TCP and UDP to that computer, keeping external and internal numbers equal.
Example only · replace IP and port
TCP + UDP 50000 → 192.168.1.50:50000
Using UPnP/NAT-PMP instead? Inspect the router’s actual mapping. A checked box does not prove a rule exists. For stale rules, use the port forwarding checklist.
Run the port test again. If the port opens, you can stop here. If it stays closed despite a matching rule, check the extra network layer below.
Home connection without a VPN · port still closed
Still blocked? Check CGNAT or double NAT
Your own router may sit behind another router, or behind an address shared by your internet provider (CGNAT). A rule on your router alone cannot open that extra layer.
Compare these two addresses for the home connection:
Router’s WAN IPv4
Find it in the router’s Internet / WAN status. This is its upstream address, not your computer’s local 192.168.x.x address.
Public IPv4
The address websites see for that home connection. Use an IP lookup; our public IP guide shows how to find it.
- WAN matches public IPv4
- An extra address-sharing layer is less likely. Recheck the listener, firewall and router rule.
- WAN is 100.64–100.127.x.x
- This is shared address space. Ask your ISP whether it can provide public IPv4 with incoming connections allowed.
- WAN is private or different
- Another network layer may be present. If it is a second router you control, configure both; otherwise ask your ISP.
Need help interpreting the result? Use the CGNAT check or double NAT guide.
No router access, or no public IPv4 available? A VPN with port forwarding may provide an alternative: peers reach a port on the VPN server, which sends their connections to Deluge. Here is how that setup works.
For an existing VPN, or an alternative to the ISP route
Deluge VPN port forwarding
Use this section if Deluge already connects through a VPN, or if the home-network checks above showed that you need another way to receive connections. The VPN exit is the provider’s server that connects you to the internet; that is where the incoming port must be opened.
- Get the forwarded port from your VPN. Enable its port-forwarding feature on a supported server. If the service has no such feature, Deluge cannot create that mapping by itself.
- Match Deluge to that number. In Preferences → Network, disable random incoming ports, put the forwarded number in both range fields, and Apply. Confirm Active Port matches; leave outgoing ports at their defaults.
- Update the firewall and retest. Keep your VPN protection active. Test that VPN connection and port, then repeat after reconnecting if the assigned number changes.
Deluge port issue with NordVPN
NordVPN does not offer port forwarding. P2P support can allow outgoing transfers without making Deluge reachable from outside. If downloads suddenly stop, inspect the torrent and connection too; the warning alone does not establish the cause. See our VPN forwarding comparison.
Deluge PIA port forwarding: use the assigned port
There is no universal “best port” for PIA. Use a supported forwarding location and copy the current assigned number into Deluge’s incoming range. In Gluetun, check the provider integration and port-update automation for your version. For complete steps, see our PIA port forwarding working setup & fix guide.
Proton and PureVPN settings for existing subscribers
Proton: Enable forwarding on a supported P2P connection. Copy Active Port into both incoming range fields in Deluge; turn off random incoming ports and Deluge’s UPnP/NAT-PMP. Apply, then verify.
PureVPN: Enable your selected port policy in Member Area and connect to a PF location. Match Deluge to that port. With either provider, verify the daemon’s route and binding after reconnecting.
If your ISP cannot provide incoming access, or you need to replace a VPN without forwarding, these are two options. Already have a working forwarded port? Return to the test; no new plan is needed.
This page contains affiliate links. If you sign up through them, NAT Checker may earn a commission at no extra cost to you.
Proton VPN Deluge port forwarding
A practical fit for Deluge’s single incoming port: copy the active VPN port into the client.
- View the assigned port in a supported VPN app.
- Receive incoming peers without router admin access.
- Use one port number for TCP and UDP mappings.
Paid plan and P2P server required. Disable Moderate NAT. Update Deluge when the assigned port changes.
Choose Proton VPNPureVPN Deluge port forwarding
A flexible fit when you prefer selecting your own incoming port through a forwarding policy.
- Choose the port to match your Deluge setup.
- Manage forwarded ports in the member dashboard.
- Create an incoming path through a supported VPN exit.
Requires the port-forwarding add-on and a PF-supported location. Check device, protocol and total price.
Choose PureVPNDeluge Docker port issue: follow the daemon
Use this section when Deluge runs in a container on a NAS, Synology, Unraid or Raspberry Pi. Open the connected Deluge Web UI and note Active Port under Preferences → Network. The daemon is the background program doing the downloads; the browser only controls it.
Torrent port
Your active value
TCP + UDP peer traffic
Web UI
8112
Browser administration
Daemon control
58846
Thin-client connection
Management values are common defaults; check your image. Only forward the torrent port publicly.
Ordinary Docker bridge networking
Match Deluge’s incoming port to the container’s published TCP and UDP ports, then map the router to the Docker host. LinuxServer’s example publishes 6881 for both protocols and requires setting that incoming port in Preferences. Publishing only 8112 does not publish torrent traffic.
Deluge Gluetun port forwarding
Gluetun is a container that carries another container’s traffic through a VPN. If Deluge shares that network connection, opening a Docker host port does not open a port on the VPN server. Enable the supported provider’s forwarding integration, read the assigned port, and synchronize it to Deluge after changes. For complete compose templates and automated sync scripts, see our dedicated Gluetun port forwarding guide. Native Gluetun integrations manage the forwarded-port firewall rule; custom setups need an appropriate VPN input rule. Avoid port redirection that leaves Deluge announcing a different public number.
Once the container and incoming port match, repeat the test for the connection doing the downloads. If the container uses a VPN, the VPN setup steps explain how to obtain its port.
Deluge not downloading or seeding?
Start here if a torrent is stuck at 0%, whether or not you also see Port Issue. Try another well-seeded torrent you are authorized to share. Experiencing similar stalls in other clients? Check our guides for Vuze not downloading, uTorrent connecting to peers, and Tixati port forwarding.
- Only one torrent stalls
- Check its seeds and tracker errors. Opening a port cannot supply pieces nobody is sharing.
- Every torrent stalls
- Check paused/queued status, stop-at-ratio, disk space and write permissions. If these look normal, return to the port and firewall checks.
Save the working port and route
Retest after restarting Deluge or changing your network connection.
See the incoming connection path
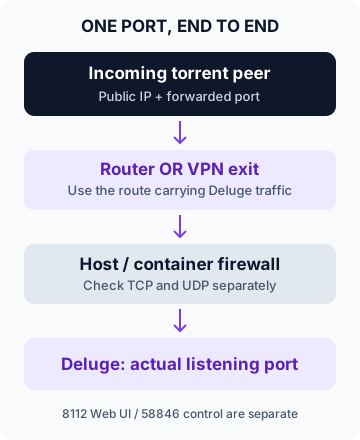
Deluge port issue FAQ
What is the default port for Deluge?
Read Active Port in Preferences → Network rather than assuming a fixed torrent port. Random incoming ports can be enabled. The LinuxServer Docker example uses 6881 for torrent traffic; 8112 is the Web UI and 58846 is daemon control.
Deluge Test Active Port triangle: what does it mean?
It is not a diagnosis of which device blocked traffic. Confirm a listener and the tested IP/port, then use an independent TCP check. If Deluge logs an error reaching its test service, that test has not established that the port is closed.
Why does Deluge show active port 0?
Treat zero as a reason to inspect the running daemon, bind address and logs before changing the router. Apply a valid incoming port and check for a local listener. Port 0 is not the public torrent port to forward.
Can Deluge download with no incoming connections?
Yes. Deluge can initiate outgoing connections to reachable peers. Incoming access expands the peers that can contact you, but does not guarantee a faster download.
Why is Deluge not seeding even though the port is open?
Check whether peers need your pieces, tracker status, queue limits, upload slots and stop-at-ratio settings. An open port cannot create demand or resume a paused torrent.
Will opening the Deluge Web UI port fix torrent connections?
No. Port 8112 serves the Web UI; the daemon commonly uses 58846 for thin-client control. Torrent peers need the configured incoming torrent port. Keep administrative interfaces off the public forwarding rule.
Sources and review notes
By OwoZhero · Reviewed September 10, 2026. Documentation and source-code review, not a hands-on VPN benchmark.
Based on Deluge’s status logic, its port-test implementation, LinuxServer’s Deluge image and Gluetun’s forwarding guide. Features and labels depend on the installed version.